Monday 27 June 2016

My Favourite Perfume


So for the past couple of months I have been completely obsessed with the, 'COCO Eau De Toilette Chanel Paris' perfume!

I'm a massive lover with any Chanel product but as soon as I did a test spray in Debenhams, I instantly knew that I had to have it!  It has quite a sweet scent to it which I love without it being to sickly. And every time I wear I always get lots and lots of compliments and request of what it is and where did I get it.

Since I purchased this perfume, I have been using it non- stop! I only have a quarter left of this product, and I 'm going to be so, so upset when it has all gone!

Furthermore, as well as the amazing quality of the actual product, I feel that it is also right to talk about the packaging! First of all, if you know me, then you will know that I'm completely obsessed with vintage! Anything vintage and I'm there! Every time my family and I (or friends) go to Brighton, or anywhere with a, Cath Kidston (because we don't have one where we live!)  for that matter, whoever I'm with has a difficult job of trying to get me to leave the shop! I literally want to buy everything that they have and never, ever leave!

Anyway so back to the point! This perfume stands out far from, from any other perfumes that I have. It is in a tall bottle, and has a big black lid, with gold outlining to make it stand out! And the bottom halve of the perfume, (which contains the product!) is transparent, has a perfectly sized label (so you know what it is!) And it shows of the golden, coppery, bronzy product amazingly!

The price does vary from where it is from, but as linked here  and above takes you to the Debenhams page where I found it to be at it's cheapest!

Debenhams price this product as £49.00 for 100ml, whereas, places such as Feel Unique price it is, £54.50.

Overall, for this particular product I don't think that it is to expensive for the amazingness that it is!


Follow

Monday 20 June 2016

My Top Four Favourite Real Techniques Make Up Brushes!


Left To Right; 'Pointed Foundation Brush', 'Setting Brush' ,'Buffing Brush', 'Multi Task Brush.'


So, if you know me then you will know that I'm a massive fan of the, 'Real Techniques' make up brushes! This is because they are so amazing, and there is a brush for every purpose. I currently own quite a few, 'Real Techniques' brushes so far, but I plan on getting more! I also plan on purchasing the, 'Bold Metals' ones, as they are so beautiful and have had really great reviews! 
Because I own quite a few of these brushes I thought that I would share my top four absolute faves (which was hard as there all my favourite!) but I may also feature the others in another blog post, at a later date.

So, let's get onto the good bit, THE MAKE UP BRUSHES!

The first brush that I'm going to be talking about is the, 'Buffing Brush.' And I honestly think that this it my favourite make up brush ever! Reason being is because this brush is perfect for blending concealer and foundation! As you already know if you have read any of my previous blog posts, I don't usually wear foundation, but when I do I find this brush to be the best one! It is super, super soft and doesn't leave any streaks! Which is great because no-one want a streaky face! OH GEEZ! Anyway, another reason reason why I love this brush and for all of the brushes with the whole collection is that they are so easy to clean. I use normal hair shampoo, and a bowl of warm water to clean my make up brushes, and it literally only takes only two seconds to clean them. You then only just have to wait for them to dry! Lastly, another thing that I love about this make up brush is that as well as blending out foundation, it is also perfect for blending out concealer, especially if you sometimes want to use as your concealer as a highlighter for your cheek bones!


The next brush that I wanted to talk about is the, 'Pointed Foundation Brush.' This like the first brush I just spoke about is also perfect for foundation as it helps to get the perfect flawless look. However, because, (like I keep saying!) just normally use a concealer as my everyday make up just under my eyes, I find that because the brush is pointed, it is easy to blend out the concealer, and the brush doesn't take away loads of the product with it. And because it's so soft (like all of the brushes in this collection!) it doesn't irritate my eyes at all  So, when it comes to blending out concealer I highly, highly recommend this brush!

The third brush that is also my fave is the, 'Multi Task Brush.' Like it says in the name, this brush is suitable for anything. However, because I find that it is big for my face, I tend to use it as a powder brush to set all of my concealer, because nobody wants that going anywhere! Again like the other brushes it's super soft, and you know that the product is going on your face, without it looking cakey! 


The last brush that is my absolute fave is the, 'Setting Brush.' And I find absolutely perfect for setting the concealer underneath my eyes! Because the brush is small, and has a rounded, oval shape to it, I find that you don't need to use much product to fully set your under eyes and I find that all I need to do is do a few dabs, (if you what I mean!) and then everything's all done, and the last thing I need to do is to apply my mascara, and lipstick, and then I'm all done!


Follow

Thursday 16 June 2016

Rimmel Wake Me Up Concealer Review


So the other day when I was in town with my Sister, I decided that I wanted to try a brand new Concealer. I recently have been using the ,'Collection Lasting Perfection Concealer,' (which can I say is amazing!) But I felt as though I wanted to try something else and build up my make up collection much, much more!

But anyway, while we were in Boots I decided that I would go and look round at all of the conters in search for a new concealer (BTW I did buy other products while on our adventure, but for today's post I wanted to focus on one particular item!)

So, let's get into the good bit, THE REVIEW!


I'm not going to lie, I'm a massive YouTube addict, and I spend most of my time either watching or talking about beauty videos/blogs and or Vlogs. And I bet that it is no shocker who I watch. Yes, you guess it, my day is spent mainly watching Zoella and all those types of YouTubers! So any who let's talk about the important part.

As I said before because I'm consistently watching YouTube, I have heard all about the ever so great, 'Rimmel Wake Me Up Concealer!' And since I was in Boots, and it was right next to me, I thought that I would add it to my basket, and give it a go!

When I first saw this product on the shelf, I found that the orange lid instantly caught my attention! And without reading the label, I already knew what it was. So, I went straight over to the Rimmel counter with my sister, and within a second I was already testing the colour, 'Ivory' onto my hand.

When I swatch this onto my hand, I instantly knew that this product would be amazing! The formula of the product felt so light, and very creamy. It also left any tiny sparkle which I thought was amazing as sparkly things basically sum up my life. (And don't forget vintage, and pastel coloured things either!)

Anyway, so the next day, I thought that I would use it and see what I probably thought of it. And I can honestly say that I am hugely impressed with it and is now my go to concealer! The formula works incredibly well and I found that it lasts all day! So overall, I would highly recommend this product. Especially since, it is at a drugstore price! And I definitely, definitely recommend using this product with the, 'Rimmel Stay Matte pressed Powder' and the, 'Rimmel Wake Me Up Foundation!'


Lastly, as well as all these good points, this product is also so, so easy to blend. And I use this product alongside using a few of my Real Techniques brushes, which I will be mentioning in a future blog post, coming very soon!


Follow

Thursday 9 June 2016

Delicious Chocolate Cake Recipe


If  you know me, then you will know that I' am a HUGE chocoholic! If I could I would eat chocolate for every single meal,but sadly this would very unhealthy and would defiantly make me feel extremely unwell which would not be good!

So anyway, I have been recreating this cake recipe for a couple of years now, and every time I bake it, everyone is always asking me how on Earth did I do it or  if  I' am using t a cake box mixture. Because we all know that the Becky Crocker Cakes are amazing!

But any who, lets get on to the best part of this post, THE CAKE!


Difficulty; So Easy        Prep Time; 10 minutes
                                      Cook Time; 14- 16 minutes


Let's Do This;

You Will Need;

175g Butter at room temperature, (I use Margarine!)
175g Caster Sugar
3 Eggs
1 tsp Vanilla Extract
150g Self- Raising Flour
1 tsp Baking Powder
50g Cocoa Powder

For the Butter Cream Icing;

50g Butter at room temperature (I again used Margarine!)
200g Icing Sugar
1tsp Vanilla Extract
50g Cocoa Powder (You can add more if you want it much more chocolaty!)

Method;

1)Pre heat your oven to 180 ° . And line two round cake tines with parchment paper. And then in a mixing bowl cream together the butter and sugar. Cream it well so that the cake becomes really, really soft.

2) Next, ad in the three eggs one at a time. At first, the mixture may seem weird when all of the eggs are all mixed in, but trust me once the flour has been added the mixture will look normal again!

3) Add in the vanilla extract.

5) Stir in gently the sifted flour until it has been fully incorporated. Once the flour has been mixed in add and combine the baking powder into the mixture.

6) Add in the sifted cocoa powder and mix until fully combined.

7) Spread the mixture equally into the two really lined cake tines and then place then into the oven for 14-16 minutes.

8) Once the cakes have cooled completely, carefully take the two cakes out of the tins and place them onto two cooling racks.

9) Next for the icing, cream the butter so that it is super, super soft and stir in the icing sugar bit by bit (so it doesn't go everywhere in a big cloud of dust, like it did to me once!) until it has been fully incorporated.

10) Stir in the sifted cocoa powder. And then you are ready to ice your cake! 

Note; Make sure that your cake is completely cool as if you ice the cake while it is still warm, all of the icing will melt off, and your cake will be ruined!


And that it, you cake is complete, and now ready to amaze all your friends and family with your fabulous creation!

This cake is suitable for any creation. I have made this beauty for people birthday's and every time, who ever I bake it for they are always impressed!

This cake would also be amazing for a picnic, or a get together with friends!

ENJOY!


Follow

Monday 6 June 2016

A Day In Hastings


Today, as it was 25°  we decided that we would spend the day in Hastings as it is only a thirty minute   drive from where we live. As we have been to Hastings many times before we already knew what we wanted to do! However, there was one thing that we were especially exited for, but to our deep sadness the thing that we wanted to do (which was ride the swans!) was closed. But despite this is didn't put a stop to our day.

The first thing we did when we arrived in Hastings was go to a cute little Artisan Cafe called '1066 Bakery.' (Which I loved as it is so ,so vintage!) We have been to this cafe before, and we already knew that the food would be amazing, so we spent an hour just relaxing, while eating our lunch.

After finishing our lunch we then decided to do some shopping, and have walk round near the pier and the beach with an ice cream, to see all of the amazing views and sights all around the local area.

Overall, Hastings is such as lovely place to visit, and I really recommend going to their New Look as it is massive!


Follow

Friday 3 June 2016

May Favourites

So today I thought that I would talk to you all about the things that I loved the most during the entire month of May. As some of you may know from one of my previous blog posts, it was my 17th birthday last Thursday (26th May!), so a couple of the items that I will be mentioning in today's post were gifted to me as birthday presents!

So lets get the good bit,the favourites!


The first thing that I have been loving this month is my Crosley record player. If you follow me on Instagram you will know that I have had this since March when I brought it with an Argos voucher! Anyway back to the point! I brought this without doing any research and all I can say is that it is absolutely amazing! For the amazing value of money that it is, the sound is completely incredible. I have played so much music this past month on it. (since finding my Dad had loads of records that contain the music I already like!) And the only thing that my family can now hear is ABBA.
Lastly, the last thing that I would like to mention about this record player is that it is a decent size and it is in pastel blue! and if you know me, you will know that I love anything that is pastel and vintage, and this record player is both of those things, so this excites me so much!


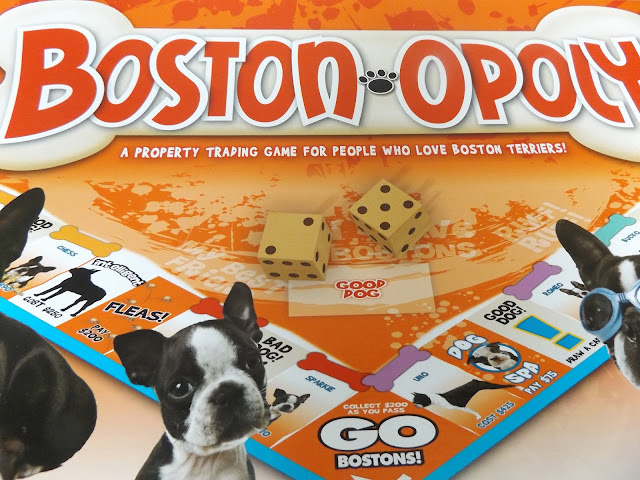
The second thing that I have been loving this month is a board game (don't see many of these in favourites!) And it is called, 'Boston- Opoly.' So, I got this as birthday present last week from my parents and all I can honestly say is that it is amazing! If you know me then, you will know that I do own Boston Terriers (and a Miniature Schnauzer, can't forget him!) and I'm completely obsessed! It has the same rules as the normal Monopoly does, but rather than buying properties, instead you buy dogs (Boston Terriers). And every night I always say to family, "Do you want to play Boston- Opoly!"
You can get this game anywhere online but because of what it is the price can vary. I remember looking at this at Christmas and the price was over £80. But since I got it much later in the year it was instead only £20! (big price difference!)


The third thing I have been loving this month is the, 'W7 In The Buff' eye shadow pallet. I have actually never heard of this brand before but I thought that I would give it ago. Overall, I have really loved it. The colours are so natural and they are so, so easy to blend. I would defiantly highly recommend this pallet to someone if they looking around for one. Also, another reason why I love this pallet is that it is such an amazing price. Overall, it only costs me £4.75 which I thing for a pallet this size, and such good quality, is just a bargain. However, the only thing to be wary of it is the lid. I think because it's price the hinges after one use just broke so I currently have to hold it with a hairband. But oh well I still give it a 10/10 for the actual product.


Shades Left to Right; "Buff," "Camel," "Sand," "Dust," "Chocolate," "Topaz," "Earth," "Storm," "Silk," "Wave," "Thunder" and, "Onyx."

The last thing that I have been loving this month is my 'Pink Kitty Tangle Teezer.' I have had my eye on a Tangle Teezer for about a year now. And I was completely over the moon and shocked when I received this as one of my birthday presents! I knew just by reviews and by YouTubers that this product would be amazing and they were all absolutely correct! I have long hair that can sometimes get quite knotty, but with this brush it literally only takes me about two minutes at the very most and when I look down at my Tangle Teezer there is hardly any hair left in the brush which is amazing!
Also these brushes are so inexpensive. The Tangle Teezer that I got only cost £12.25 which is a complete bargain for a hairbrush that I'm never, ever going to swap for any other!


Follow