Sunday, 22 May 2016

Cookielicious


So, the other day I was in the mood for baking (like I' am everyday!) and thought that I would recreate the Tanya Burr chocolate cookie recipe like I have already done at least hundred times!

As someone who bakes at least four times a week, I have to make sure that I always include these cookies as  they are amazing and  get absolutely demolished within the first 20 minutes of them being ready!

Furthermore, since I have baked these cookies lots and lots of times before, I have discovered different ways of making them absolutely amazing every time without the worry of if they are going to turn out wrong!

So let's get onto the best part, THE COOKIES!

Let's do it!

Difficulty: So easy
Prep Time; 10 minutes
Cooking Time; 6- 7 minutes

You Will Need;

200g Butter (I use margarine!)
300g Caster Sugar
1 Egg
1 Tbsp Golden Syrup (This is optional but this makes the cookies much softer and much more gooey!)
275g Self- Raising Flour
75g Cocoa Powder
Whatever chocolate you want to add. As I like my to make cookies smaller in order to get more out of each mixture, I like use to chocolate chips instead

Method;

1) Pre heat your oven to 180 (I put my oven on 180 rather than 200 so that they are softer and have less chance of burning) and line your a baking tray with parchment paper.

2) Mix the butter and sugar together in a mixing so that it is soft, creamy and much paler in colour. If your butter/ margarine has just come out of the fridge then you can heat it up (once it's been measured in the mixing bowl) in the microwave for ten seconds on it's lowest heat setting!

2) Crack in your egg and combine until it has been fully incorporated. And then add in the golden syrup!

3) Next, stir in the flour bit by bit until it it fully combined, and then mix in the cocoa powder.

4) Lastly, add in the chocolate chips, or whatever chocolate you like. And then pick up bits of the mixture and roll them into a ball. Once on the baking tray squish each cookie dough ball down slightly and then place into the oven.

Tip; Only put four cookies on each tray ( at the most!) as they will spread and you will end up with one giant cookie!


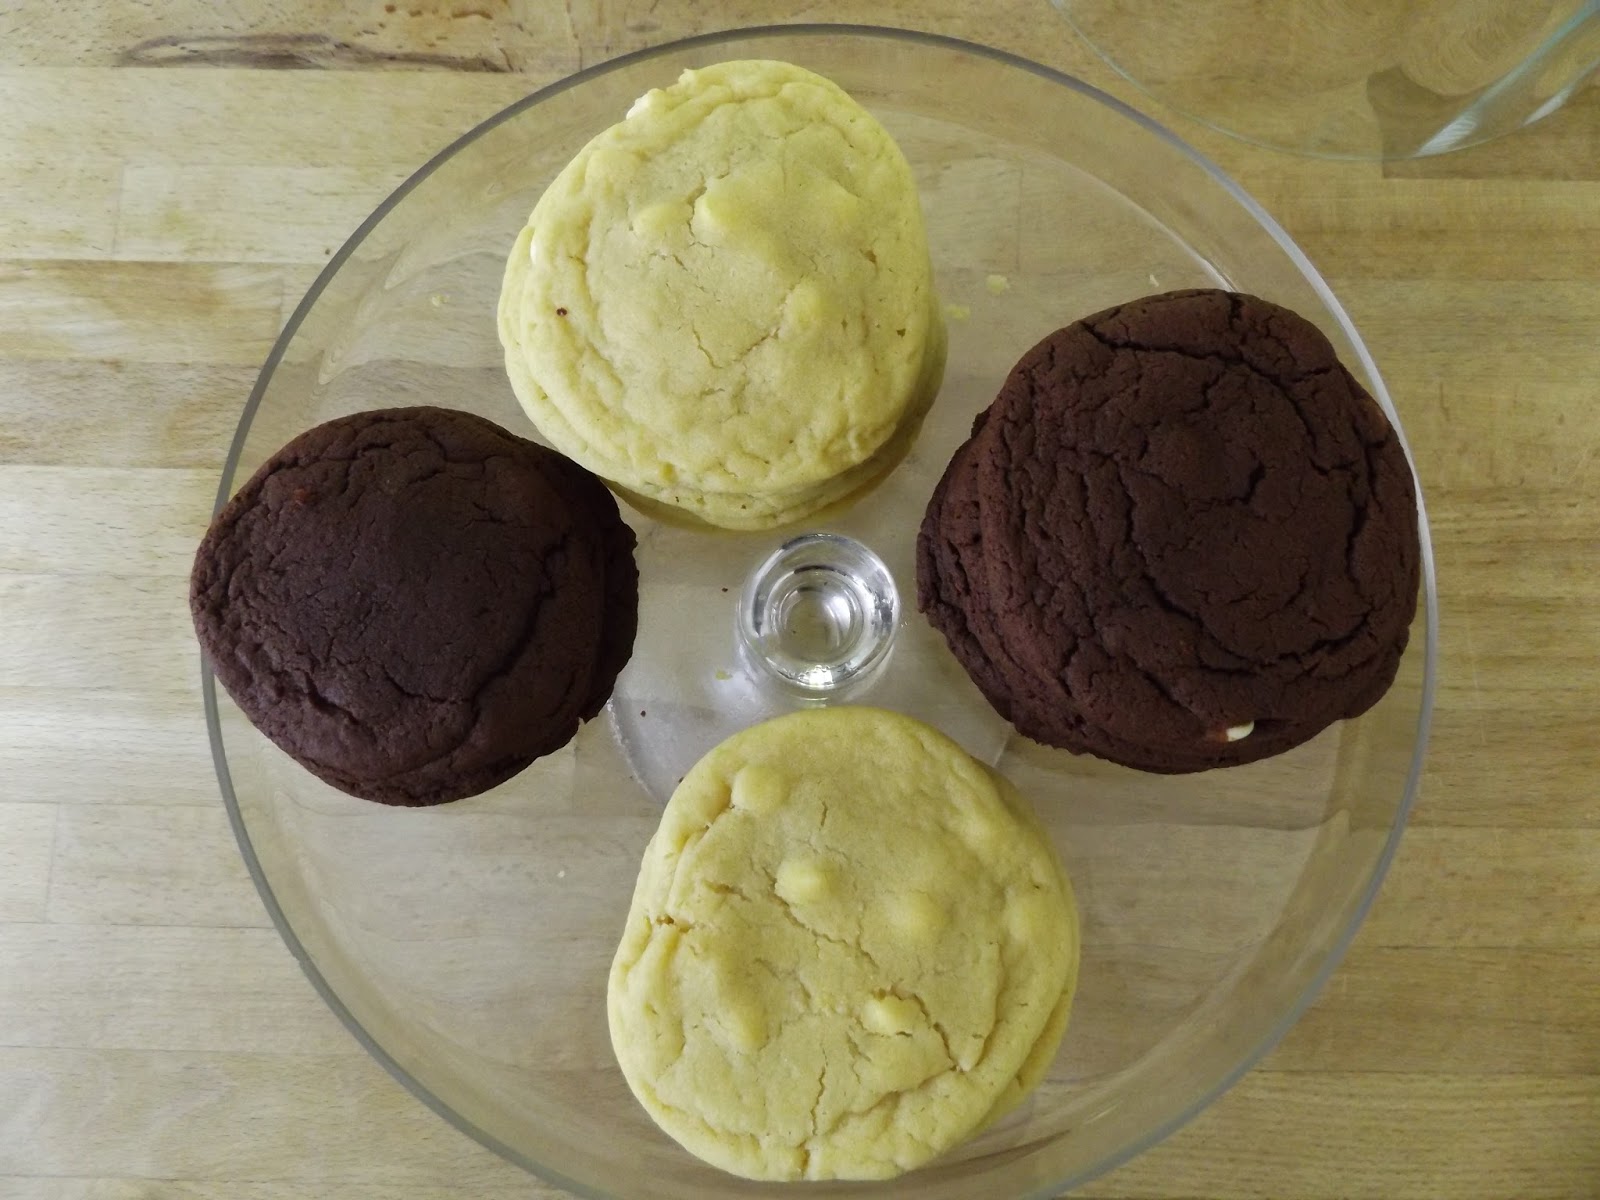
Also, I recently posted a blog post on my top two favourite bakes which featured my recreation on the white chocolate cookies that can be seen above, so feel free to have a look at it here!

Follow

Thursday, 19 May 2016

Vintage Shopping


So a couple of days ago now, my Mum and I took another trip to Heathfield. As some of you may know from one of my previous blog post, we ventured out to Heathfield to visit friends and to see what was out there has we hadn't really been there before. And we came across many vintage shops and a really, really cute bakery! 

So anyway, when we went on our recent visit we decided to have another look at this one particular shop called, 'Tinker and Toad' and it was absolutely amazing! Everywhere we looked was just vintage. (I'm a huge lover of vintage so seeing this shop made me turn into a five year old at Christmas!) It was honestly just amazing! I would have brought everything if I could! 

Tinker and Toad has absolutely everything. From clothes, all the way to furniture! And every item in the shop had it's own story to tell. Everything was either hand crafted, (like the jewelry) and refurbished to make it have a use again, 

Another thing that I deeply love about this shop is that there items that related to Harry Potter. If you know me than you will know that I'm completely obsessed with Harry Potter and I watch it at least three times a week! (literally!) But anyway, they had two sign in there saying, 'Platform 9 3/4' and, just a normal one saying, 'Hogwarts.' And there was also a wooden crate which said it was to hold potions!

Lastly, while on our adventure, we purchased a tiny 1/3 milk bottle, (which you have seen above) and some jewelry which were absolutely beautiful.


Follow

Sunday, 15 May 2016

Easy Flapjacks


When it comes to cooking there is always something that my family requests for me to bake, and that is flapjacks. Not only do these taste delicious but they also go well with every occasion either that being around with friends, or just having an outing and you feel like you would just like to take something with you that will give you extra energy, or if you are feeling a little bit peckish.

And all I can say is that these flapjacks are absolutely amazing. They are so lovely and gooey that they just fall apart when you hold them. (So, just make sure you are using a plate when you eat these.)

One thing that  I would like to say about this recipe is that it isn't mine. I feel as though a flapjack has to be perfect, and since I'm not a baking wizard, I just like to do it for fun. I feel as though this recipe is the best way to get the most amazing flapjacks that you know everybody will love. (And trust me they will!)
So, the recipe I'm using is from the book, 'Step-By-Step Baking' by Caroline Bretherton.

Anyway, so let's get onto the recipe;

Makes; 16-20 squares, it d epends how you cut them!
Prep Time; 15 minutes
Cook Time; 40 minutes


You Will Need;
225g butter - (I use margarine)
225g light soft brown sugar
2 tbsp golden syrup
350g rolled oats

1) Preheat the the oven to 150, and lightly grease a 25cm (10 inch) cake tin with butter and cover with baking parchment.

2) Put the butter, sugar and golden syrup in a large saucepan and place over a low heat. Make sure the heat is low and you stir the mixture constantly so you don't burn the any of the ingredients to the pan.

3) Remove the pan of the heat, and stir in the oats being careful not to over mix.

4) Spoon the mixture into the cake tin and press firmly down with a metal spoon to make a even layer.

5) Bake the flapjack for 40 minutes or until it's golden brown. Because of my tin my flapjack only took 30 minutes.

6) Leave to cool for ten minutes and then either cut the mixture in 16 squares, or 20 rectangles.


After baking these so many times, and hearing such good feedback from them I think that they are one of my most favourites things to bake!

If you would like to see what my other favourite bakes are you can click here.


Follow

Thursday, 12 May 2016

My Top Two Favourite Bakes


When it comes to baking there are so many recipes that I just love to try or even create. I find doing this makes me feel happy and extremely relaxed. I just love to bake, and I love seeing all of the different recipes that are out there in the world, and I just love seeing how happy everyone is when they taste all of the creations I have made!

One of these recipes that I feature below have already been featured in a previous blog post. I will link the post below within each recipe so that you will be able to find it much easier to follow.

So, lets get onto the exiting bit. The food!


The first thing that I love to bake is my Homemade Chocolate Brownies! Like I said above I have already done a blog post on this so I will leave a link for you above (as you can see) so you can read it. Anyway, I love baking these chocolate brownies are they are so delicious and they are perfect for either an gathering with friends, or if you just feel like having a cozy day were all you want to do is just relax! And because these brownies are so gooey and so soft, they go so well with a big cup of tea (or a glass of milk!) and a sit down watching T.V. or YouTube in my case!
Lastly, these brownies are so easy and quick to make, so you can always assure that they will be perfect! And if you are anything like me, you will be lucky if they last any longer than ten minutes!


Lastly, the last two things that I love to bake are actually a recipe from Tanya Burr. They are the, 'White Chocolate Cookies' and the, 'Plain Chocolate Cookies' or as describe on her blog post I believe that they are called, 'The Best Chocolate Cookies Ever!' However, because of how much I love to bake, I have sort of adapted the recipe of the white chocolate cookies.

Prep Time; 10 minutes
Oven Time; 6-7 minutes baking time, However, it depends on the size of the cookies. I do mine quick small!


So, You Will Need;                                      

200g Butter (I use margarine)
300g Caster Sugar
1 Egg
1 1/2 tablespoons of golden syrup
375g Self Raising Flour
At least four handfuls of chocolate chips, But you can use what ever chocolate you like.

1) Pre- heat your oven to 150 and line a baking tray with parchment paper. Yes, I know this seem quite low for an oven, but I promise because the cookies are plain white and not chocolate, they are more likely to burn. But again it depends on the size of your cookies, if you want them to be a bit bigger than mine turn the oven up to 180, but no higher!

2) Cream together the butter/ margarine and the sugar. If your butter is quick solid pop it into the microwave for 10 seconds on the lowest heat setting so it softens. (If still quite firm do another 10 seconds and then start creaming!) You want to make sure the mixture is extremely soft and it goes paler in colour.

3) Crack in your egg and mix it into the mixture.

4) Add in the golden syrup, and stir.

5) Once the golden syrup has been mixed in, mix in the self raising flour bit by bit in order to avoid mess. (However, even by doing this I still make a big mess whoops!)

6) Add in the chocolate chips, or whatever chocolate that your heart desires!

7) Roll sections of the mixture into round ball shapes. You can make them however how big or small you want them to be!

8) Place the balls of cookie dough on the baking tray (I would do no more than four at a time, as they spread a lot during their cooking time!) Squish them down a tiny bit, and then place into the oven. If you want soft, gooey cookies like how you get them in, 'Millies Cookies' then do them for no longer than 6-7 minutes minutes. Or until they just start to crack at the top. Again, it depends on the size of your cookies!

And remember; when you get the cookies out of the oven they will feel as though they are not done. The cookies are still cooking inside while they are cooling down, you will have to leave them for at least ten minutes before you can eat them as they will, just fall apart in your hands!

However, after ten minutes you can always transfer them to a cooling rack!

These cookies are perfect for a rainy day or again having a gathering with friends!


What are your favourite recipes?


Follow

Sunday, 8 May 2016

My Make Up Must Haves


So today, I wanted to talk about some of my favourite make up items that I have been seriously loving at the moment. These favourites range from eye products all the way to lip products and I can't wait to share with what they are and why I have been loving them.

So just a quick little story, I wandered into Boots with my Mum a couple of weeks ago and really wanted pick up some more Rimmel London nail polishes (which I raved about in a previous blog post) but because all of the make up in my Boots store is just staring at you as soon as you walk through the front door it was only right just to go have a look and maybe pick up a few (meaning a lot) of items and go buy them.

I did end up buying some more nail polishes but I also managed to get a few brand new make up items and end up making most of them my favourites.

So, my first favourite item is actually two lip crayons from Collection. The lip crayons I brought were the, 'Work The Colour Matt Lip Butter' in the colours, ' 01, Marshmallow Pink' and '02, Pumpkin Pie.'  And can I say these two  lip crayons are one of the best things I have ever owned. Not only are they an amazing price, but they work incredibly well. The colour is true to the name and it is so easy to apply. Normally with lipsticks, I have to be careful as sometimes I end up smudging it or end up making my lips 10 times bigger then they actually are! But with these it only takes seconds to apply and if you do go wrong it is so easy to wipe away and it doesn't leave any traces. Lastly, because these lip crayons are like a butter, they are so soothing and they don't dry your lips up at all.


My second favourite item is also a lip product and it is the Rimmel London lipstick in the shade '170, Alarm.' And yes t he shade of the lipstick is indeed red. I thought that I would be bold and try a new colour. Normally, when I have tried  applying red lipstick it has gone wrong and I end up with it all done my chin. However, like the Collection Work The Colour Matt Lip Butter it is super easy to apply and I find that the colour lasts a long time. Which is good thing for me! Anyway, this lipstick is bit more expensive then the Collection ones but since as it is a drugstore it is still a good price. Lastly, another good thing that is great about the Rimmel lipsticks is that they come in a wide range of colours so you wide range of choice if you are thinking about purchasing any.


My third favourite make up item is actually an eye product. This product is the Soap And Glory SuperCat eye liner. Before purchasing this product, I was not able to apply eye liner in any matter especially when it came to the cat eye look. However, because this eye liner resembles a felt tip it is very precise, and it easy to make the cat eye effect look neat and well polish. This eyeliner is also great for long wear use as the colour lasts a long time, and it takes a while for it to start to fade. Furthermore, again because it like a felt tip it is easy to grip and you don't have to worry about making any mess.


The last item I'm going to be talking still resembles make up, but instead of a product, it is just simply make up brushes. It probably won't come as a shock that these brushes are my favourite as they are used by many others, and they are very highly rated. These brushes are Real Technique. And can I say they are absolutely amazing! Not only do they look fantastic, but they are so soft, and it makes apply make up so much easier. I rarely wear foundation like I explained in my other blog post. I manly wear a BB cream, but I use concealer just under my eyes to cover my dark circles, or anywhere were I may have imperfections. But especially the Concealer brush it makes is soft easy to blend the product and it makes it look as though you have nothing on your face.


Follow

Thursday, 5 May 2016

My Everyday Skin Care Routine


As some of you may know from my previous blog post, you may be aware that I am seriously obsessed and cannot live without my, 'Simple Kind To Skin Moisturising Facial Mask.' I thought that I would show you how I use it, when I use it (well everyday day) and what other products I use along side it.

So, since I don't really wear a lot make up (i.e that being foundation, expect for BB creams that I do use most days!) I don't really have to spend a lot of time looking after my face each day. However, despite this, I still like to keep it as healthy and clean as possible so that it is always feeling as it's best. And to do this the first thing I will use is the, 'Simple Kind To Skin Vital Vitamin Foaming Cleanser.' And can I say this stuff, like the moisturising face mask is amazing. It's so easy to use, and because it's a foam you don't have to use a lot of product on every use. You essentially pump two to three pumps of the product into your hands and just gently cleanse it onto your face. It's as 'simple' as that. After I have used and rubbed all the product on to my face I will wet a face cloth lightly with warm water and will just run it all over my face.


After I have applied the Foam to my face I will then use the, 'Simple Kind To Skin Moisturising Facial Mask.' Again, like the foam you don't need a lot of product. I just add a tiny bit to my tips of my fingers and will just add the smallest amount of warm water to it just to make it foam a tiny bit. Then I will just put around my face (except my eyes) and will keep it on just for a few minutes. Once the minutes are up I will again take it of with a wet, warm face cloth and will then move on to the final product.


So, the last thing I will use is the, 'Garnier Essentials Hydrating Day Care Face Cream.' Out of all of the face creams I have ever used I feel as though this is the best one yet. This is because it's not greasy and again like the Simple products you don't need a lot of it. You simply need roughly small two finger scoops worth (if that makes sense!) of the cream and simply place and rub it in gently all over your face. And obviously  because it's a cream you don't need to rinse it of your face. You just apply the cream and leave it. 


When it comes to my skincare routine I will do it once everyday. However, with the Garnier face cream I will apply in the morning as well just to make my face soft ready for when I apply my make up. 


Follow

Sunday, 1 May 2016

April Favourites

Over the whole of month of April I have found so many new things that I deeply love. These include items from beauty all the way to fashion and food (yum!) and I'm looking forward to show you all what they are;

Ok, so the first thing that I have been loving this month are the Rimmel London Rita Ora nail polishes. And can I just say these are AMAZING! They are so easy to apply, and it only takes 60 seconds for the polish to dry. This is a essential to have when owning nail polishes for me as I always end up chipping it or smudging it and I then have to take it all off, and start again.

Furthermore, not only this but they also come to a massive range of colours. Which is good for me as I know that every time I'm in need for a polish update I know that I'm gonna have choice of what colour I'm going to use rather than having to stick to the same colour. (Which most of the time I know it will be a pastel color because I'm obsessed as it suits me really well!)

I currently have six of nail polishes and I will continue to purchase more!

And lastly, these polishes only cost £2.98 each and you can get them from anywhere that stocks make up such as Boots and any supermarkets.


The second thing that I have been loving this month are Party Rings. Yes! this probably sounds weird but recently they have been one of my addictions and every time I open up a new packet it reminds me of when I was a child. I just love the pastel coloured icing on them (especially the pink!) and they just taste amazing!

The third thing that I've been loving is the, "Simple Kind To Skin Moisturising" Facial Wash. I remember raving about this product back in my recent blog, which was almost a year ago but still to this date I use it everyday and I can honestly say it has helped my skin a lot. My face is smoother and a lot clearer. I don't wear foundation as such at all unless I'm going out anywhere special but I still find that it has benefited my skin a lot. Also, this item is inexpensive so you don't have to worry about spending lot's of money on one product. You also only need a tiny amount of the products on every use as a tiny bit goes a long way.


The last thing that I have been loving is my Instax Mini 8 Fujifilm Camera, also known as a Polaroid.This camera is one of the best things I have ever owned as the photos you take last forever, and unlike a computer you don't have to worry about losing your memories as they will always be with you. Furthermore, because the photos are only credit card sized, you are able to present them in any way possible. For example, you could hang a long piece of string across a wall, and then using some tiny pegs, you can hang them up as if it were bunting. Or you could peg them to some battery operated fairy lights and you can admire their beauty while they are being lit up.

Moreover, the quality of the camera is just amazing. Not only does it look beautiful  but the pictures that it produces are such good quality and you are able to adjust the setting of the camera for if you are indoors or outdoors. And lastly, I just love the colour of the camera as it is baby pink (which I love) but there are also over colours such as blue, yellow, white and red etc.


(The price of the Fujifilm camera does vary from where it is from)


Follow